

Introduction
If your team lives in Outlook but runs jobs in Simpro, every manual copy‑and‑paste between the two is wasted time and a risk for errors. A well‑configured simpro outlook integration can turn everyday emails and calendar bookings into structured, trackable work inside Simpro.
This guide is written for Australian small to medium trade, construction, maintenance, and field service businesses. It walks through how to connect Simpro and Outlook, turn emails into leads and jobs, use calendar sync, and automate routine customer communications without losing control of your workflows.
As an implementation partner, Sync Stream focuses on making these connections reliable, documented, and easy for your team to follow. The steps below are practical and grounded in how office staff, schedulers, and technicians actually work day to day.
Why connect Simpro and Outlook
How the integration works in practice
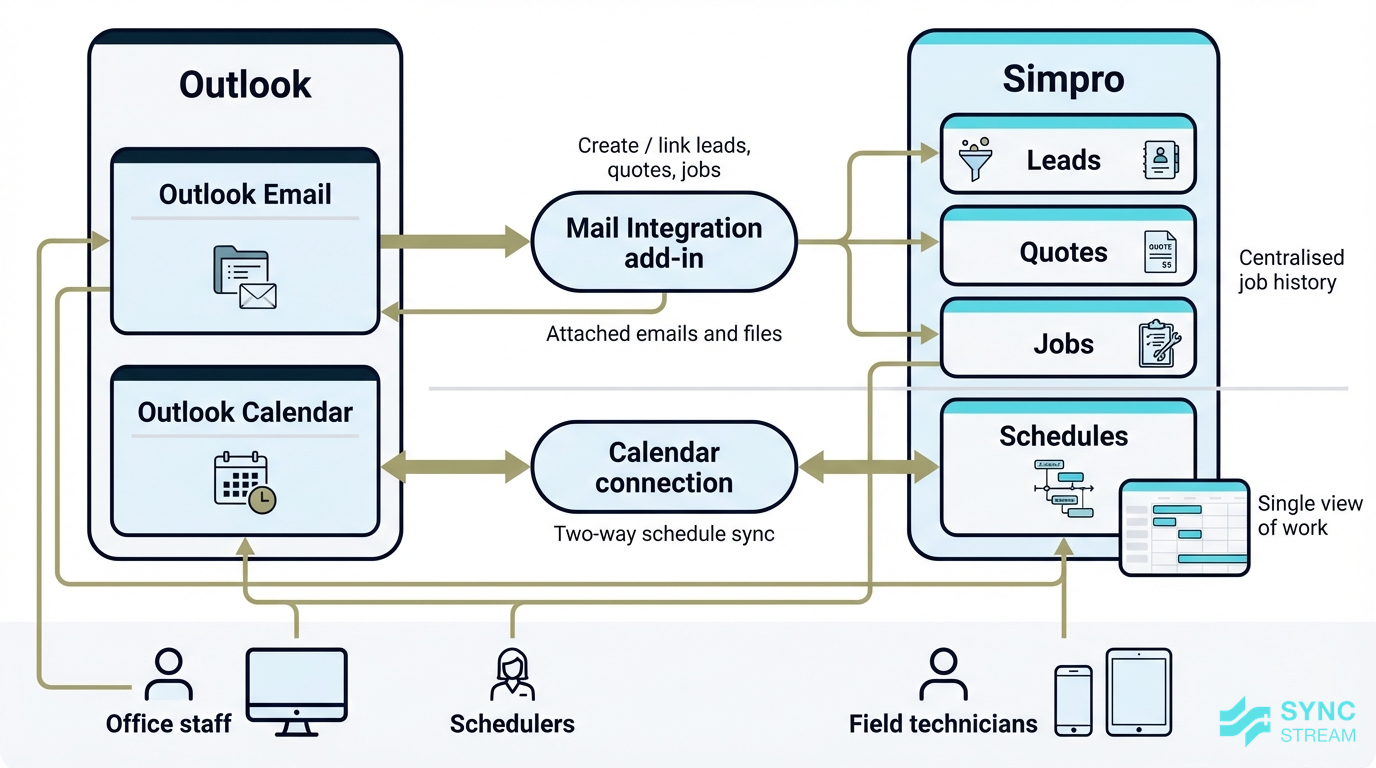
At a high level, the Simpro–Outlook setup has two key components:
- Mail Integration add‑in – This lives inside Outlook (desktop or web). When a user opens an email, they can open a Simpro panel where they can view or create leads, customers, quotes, and jobs directly from that email.
- Calendar connection – This links Simpro schedules with each employee’s Outlook calendar, so staff can see their Simpro bookings alongside other meetings and appointments.
Day to day, users see a Simpro Premium icon in Outlook. Clicking it opens a panel on the side where they can:
- Create a new lead or customer from an enquiry email.
- Attach an email (and its attachments) to an existing lead, quote, or job.
- See a quick summary of the contact and related jobs without leaving Outlook.
On the calendar side, a scheduled job in Simpro appears as an appointment in the employee’s Outlook calendar. Likewise, an appointment created in Outlook can sync back as a schedule in Simpro, depending on your configuration.
For Australian trade and field service businesses, the practical outcomes are:
- Less double data entry – fewer details manually re‑typed from emails.
- Fewer missed leads – enquiry emails become visible, trackable leads in Simpro.
- Centralised job history – email threads and attachments live against the job.
- Clearer workload visibility – staff and managers can see all work in one calendar.
Preparing your accounts
Check Outlook and Simpro requirements
Before touching settings, confirm your environment is supported and that the right people have admin access:
- The Simpro Outlook add‑in supports Office 365, Outlook.com, and Exchange Server 2019 accounts.
- Shared inboxes are not supported by the Simpro Outlook add‑in. Each user connects their own mailbox.
Make sure you:
- Know who your Microsoft 365 admin is (this may be an external IT provider).
- Know who your Simpro system administrator is (often an operations or office manager).
- Confirm they are available to approve add‑ins or adjust permissions if needed.
Set expectations about data up front:
- Only records created after the integration is enabled will sync.
- Historic emails and calendar items won’t automatically appear in Simpro.
- If you need older information in Simpro, staff will have to attach key emails manually on a case‑by‑case basis.
Setting this expectation early avoids confusion when older bookings or email threads don’t show up automatically.
Decide who needs access
Decide who actually needs the integration, based on roles rather than individuals:
- Reads customer emails: admin staff, schedulers, sales, project managers.
- Needs calendar sync: field technicians, estimators, supervisors, directors.
A sensible approach is to start with a pilot group before rolling out to everyone, for example:
- Office manager or scheduler.
- One or two field technicians or supervisors.
This pilot group can test the integration, refine internal rules, and surface any issues with your specific Microsoft 365 or Simpro setup.
Document a few simple internal rules from the start, such as:
- Who creates leads from emails (e.g., all new enquiries to be turned into leads by the office within one business day).
- How to name jobs (e.g., suburb – client name – brief description).
- When to attach to an existing record vs creating new (e.g., ongoing maintenance contract = attach to existing job; new site or scope = create new lead/job).
These basics prevent duplicate records and keep your Simpro data clean as usage grows.
Configure mail integration add-in
Installing the Outlook add-in
Install the Mail Integration add‑in via Microsoft AppSource or directly from Outlook:
- Open Outlook (web or desktop) while signed into the work account you use with Simpro.
- Go to Get Add‑ins (sometimes labelled Apps):
- Outlook on the web: click the Settings (cog) icon > View all Outlook settings > Mail > Customise actions, or use the Apps icon from the toolbar.
- Outlook desktop: from the Home ribbon, click Get Add‑ins or Store.
- In the store/AppSource search bar, type "Mail Integration for Simpro Premium".
- Select the correct add‑in and confirm it’s the official Simpro integration.
- Click Get it now (or Add) to install it to your Outlook account.
Expected result: when you open an email, you should see a Simpro Premium icon in the ribbon or under the More actions (⋯) menu.
If you don’t see the Get Add‑ins option, or you’re blocked from installing, contact your Microsoft 365 admin or IT provider and request they approve the "Mail Integration for Simpro Premium" add‑in for the relevant users.
Linking Outlook emails to Simpro
After installation, link Outlook and Simpro for each user:
- Open Outlook and select any customer‑related email.
- Click the Simpro Premium icon to open the panel on the right.
- The first time, log in with your Simpro credentials.
- Authorise the connection if prompted.
Once connected, the core workflow is:
- If the email is from an unknown address, the add‑in will allow you to create a new lead or customer directly from the panel.
- If the email address matches an existing contact, you can:
- Open or select the linked lead, quote, or job.
- Attach the email to that record so future users can view the thread from within Simpro.
You can also save email content and attachments into Simpro without downloading them first. For example:
- A customer emails a purchase order and site photos.
- From the Simpro panel, you choose the correct job and attach the email and all files.
- When a technician opens the job in Simpro, they can see the PO and photos on their tablet or phone before attending site.
Over time, this builds a complete, centralised history of each job without staff leaving Outlook.
Set up calendar synchronisation
Matching staff records and emails
For calendar sync to work reliably, each Simpro employee record must use the same email address as the staff member’s Outlook/Microsoft 365 account.
To check and tidy this:
- In Simpro, open Employees and select an employee (their card file).
- Confirm that the Email field matches their work Outlook address exactly.
- Update the email if needed and save.
- Repeat for all staff you plan to include in calendar sync.
Before you switch on sync, review which staff actually need it:
- Field technicians and apprentices who rely on mobile calendars.
- Supervisors or project managers coordinating multiple jobs.
- Estimators or directors who juggle site visits and client meetings.
Use this opportunity to clean up duplicate or outdated employee records in Simpro. Remove or archive old records and ensure each active staff member has a single, accurate employee profile.
Activating and testing calendar sync
With staff records aligned, activate calendar sync per employee:
- Open the employee’s card file in Simpro.
- Locate the calendar connection or Outlook sync option.
- Initiate the connection, which sends a verification email to the address listed.
- In the employee’s Outlook inbox, open the verification email and either:
- Click the verification link, or
- Enter the verification code back into Simpro, as instructed.
- Confirm in Simpro that the calendar is now connected.
Once enabled, the sync is typically two‑way for new items going forward:
- New schedules created in Simpro will appear as Outlook appointments.
- New appointments created in Outlook (that meet the sync rules) will appear in Simpro.
- Older appointments created before enabling sync usually won’t backfill.
To validate that everything is working, run a simple test for each synced employee:
- Create a short appointment in Outlook (e.g., "Test – Simpro Sync" for 30 minutes this afternoon).
- Wait a few minutes and check the employee’s schedule in Simpro to ensure the booking appears.
- In Simpro, move or extend an existing schedule for that employee.
- Check their Outlook calendar to confirm the appointment updates accordingly.
If the test fails, confirm the email address in Simpro matches Outlook, check that the verification was completed, and involve your IT contact if permissions may be blocking the sync.
Designing email-to-job workflows
Turning incoming emails into jobs
Once the basics are connected, the real value comes from clear email‑to‑job workflows. Common patterns include:
- Enquiry emails → Leads: New customer enquiries from your website or referrals become leads in Simpro.
- Approved quotes → Jobs: When a customer replies "go ahead" to a quote email, staff convert the quote to a job and schedule work.
- Maintenance requests → Scheduled visits: Strata managers or facility clients email issues that become recurring or one‑off jobs.
Staff should know how to choose between creating a lead, quote, or job from an email. For example, in an Australian trade context:
- Emergency call‑outs (burst pipe, no power, refrigeration failure):
- Create a job directly from the email and schedule the first available technician.
- Planned installs or renovations (new switchboard, solar install, office fit‑out):
- Create a lead, gather more details, then progress to a quote.
- Ongoing service contracts (quarterly HVAC maintenance, test and tag):
- Attach the email to the existing contract or job and adjust the schedule if needed.
Establish a consistent internal workflow, such as:
- Who handles new enquiries – e.g., admin reviews all new emails to the main address by 10am and turns them into leads or jobs.
- Typical response times – e.g., all new enquiries acknowledged same business day, urgent issues within 30–60 minutes.
- How emails are tagged or noted – e.g., adding notes in the Simpro panel like "Urgent – cold room down" or "Strata – Building A, Level 3" so schedulers see context at a glance.
Managing attachments and records
The Outlook add‑in makes it easy to keep job records complete by saving attachments directly into Simpro:
- Plans and drawings (PDF, DWG exports).
- Photos and videos from site.
- Signed quotes, variations, and POs.
A typical scenario:
- An electrician receives an email with switchboard photos and a marked‑up floor plan from a builder.
- They open the Simpro panel, link the email to the relevant quote or job, and tick the attachments to save.
- When technicians attend site, they open the job in Simpro and can see those photos and plans on their device.
To make these records useful over time, adopt simple conventions:
- Add a short description when saving attachments (e.g., "Level 2 switchboard – pre‑works", "Signed variation #3 – kitchen circuits").
- Avoid saving multiple versions with unclear names – delete obsolete files or rename clearly.
- Encourage staff to attach key approvals and safety documents so everything required for compliance and audits is in one place.
Over months and years, these small habits significantly reduce searching, disputes, and rework.
Automating customer communication
Using templates and automation in Simpro
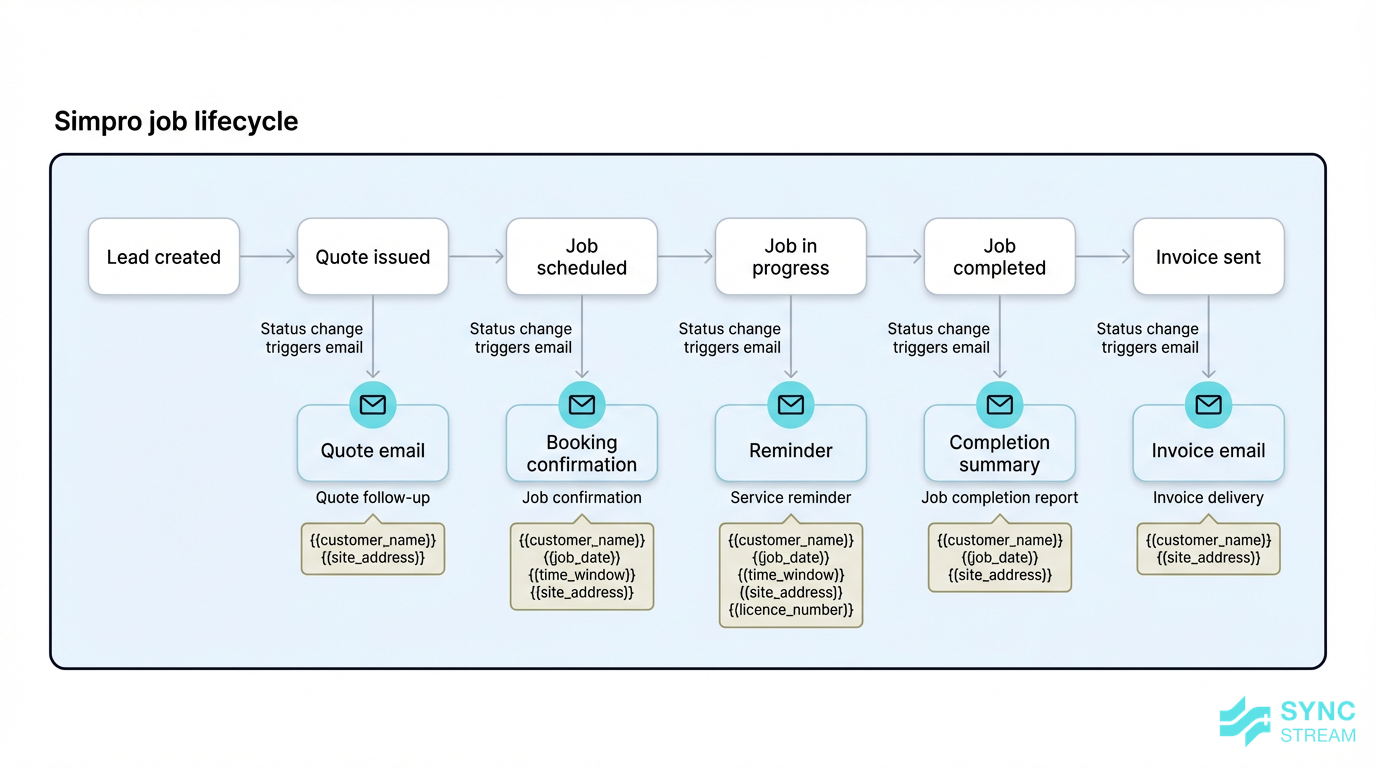
Job status changes in Simpro triggering templated emails like confirmations, reminders, and completion notices.
With reliable email‑to‑job workflows in place, Simpro can handle a lot of routine customer communication using templated emails. Common examples include:
- Quote issue emails with a link or PDF.
- Booking confirmations once a job is scheduled.
- Job completion notices summarising work done.
- Invoice emails with payment terms and options.
These templates can pull in customer and job fields to personalise messages (name, address, job number, date, technician, licence numbers). You can also tie them to status changes or key milestones, so once a job is created from an Outlook email, Simpro sends the right updates automatically.
For example, an Australian service business might use:
- Job confirmation template:
- "Hi {{customername}}, your booking is confirmed for {{jobdate}} between {{timewindow}}. Our technician {{technicianname}} (licence {{licencenumber}}) will attend {{siteaddress}}. If you need to reschedule, call {{office_phone}}."
- Service reminder template:
- "Hi {{customername}}, your scheduled {{servicetype}} at {{siteaddress}} is due in the week of {{duedate}}. Reply to this email or call {{office_phone}} to confirm a suitable day."
By standardising these touchpoints, your team spends less time retyping similar emails and customers receive consistent, professional communication.
Leveraging Outlook for follow-ups
Outlook still plays an important role alongside Simpro’s automation, especially for high‑value or complex work where personal follow‑up matters.
You can use Outlook to:
- Set calendar reminders or tasks to follow up on large quotes a few days after sending.
- Flag important emails (e.g., from key commercial clients) so they remain visible until actioned.
- Create rules and folders to group Simpro‑related emails, such as all replies to quotes or all emails from a specific facilities manager.
Standardise email signatures and basic wording in Outlook to align with your Simpro templates. For example:
- Consistent trading name, ABN, licence numbers, and contact details.
- Similar tone and phrasing in manual emails and automated ones.
This consistency means customers get a unified experience regardless of whether an email was triggered by Simpro or typed manually in Outlook.
Working within system limits
Common problems and real-world gaps
Like any integration, there are limits and real‑world friction points you need to manage.
Key constraints include:
- No support for shared inboxes in the Simpro Outlook add‑in.
- Reliance on supported Outlook accounts (Office 365, Outlook.com, Exchange 2019).
- Only new emails and appointments after activation will sync or be available to attach easily.
Common issues that can arise are:
- Duplicate leads or customers if staff repeatedly create new records instead of linking to existing ones.
- Emails not attached to jobs because staff forget to use the Simpro panel when actioning their inbox.
- Mismatched calendars when staff use personal email accounts on their phone instead of the work account linked to Simpro.
Practical mitigations include:
- Short, focused staff training – 30–60 minutes to walk through real examples of turning emails into leads/jobs and attaching files.
- Clear, written processes – one‑page guides on when to create vs link, and who is responsible for each step.
- Periodic data clean‑ups in Simpro – merge duplicates, archive old employee records, and review templates.
- Involving your IT contact early – ensure they understand what the integration needs, so if permissions or licensing change, the simpro outlook integration keeps working reliably.
If you want deeper automation or more complex rules (for example, routing different types of enquiries to different pipelines), an implementation partner like Sync Stream can help design and document those workflows on top of your existing systems.
Conclusion
Connecting Simpro and Outlook is one of the fastest ways to reduce admin overhead, tighten up scheduling, and keep customer communication consistent in a trade or field service business. With a well‑planned simpro outlook integration, your team can turn emails into structured leads and jobs, keep calendars aligned, and let Simpro handle routine messages while Outlook remains the day‑to‑day inbox.
By preparing your accounts, piloting with a small group, designing clear email‑to‑job workflows, and training staff on simple habits, you can get the benefits without creating chaos in your data.
If you want support designing these workflows, documenting them, or extending the integration with additional automation, Sync Stream can help you scope and implement a solution that fits your existing systems and delivers a clear commercial outcome.
FAQ
Does the Simpro–Outlook integration work with shared mailboxes?
No. The current Simpro Outlook add‑in does not support shared inboxes. Each user connects their own Office 365, Outlook.com, or Exchange 2019 mailbox.
Will old calendar appointments and emails appear in Simpro after I connect?
Generally, no. The integration focuses on items created after the connection is enabled. You can manually attach older key emails to jobs if needed, but past calendar appointments won’t usually backfill.
How long does it take to set up the integration for a small team?
If your Microsoft 365 and Simpro environments are in good shape, a simple pilot (office manager plus a couple of field staff) can often be configured and tested in half a day, plus time for staff training and process tweaks.
Do technicians need the Outlook app on their phone for calendar sync to work?
They don’t have to use the Outlook app specifically, but they must be viewing the same Microsoft 365 account that is linked to their Simpro employee record. Many teams use the Outlook app because it handles work accounts cleanly.
What if staff accidentally create duplicate customers from Outlook emails?
You can merge duplicates in Simpro, but the better solution is prevention: train staff to search for existing contacts in the Simpro panel before creating new ones and document simple rules for naming and checking records.
Can we automate more complex workflows than the standard integration provides?
Yes. Using orchestration tools and Simpro’s APIs, it’s possible to build more advanced routing and automation around your inbox and job workflows. Sync Stream specialises in designing and implementing these kinds of integrations on top of your existing systems.
Is this integration secure for my business data?
The integration relies on your existing Microsoft 365 and Simpro security. Each user authenticates with their own credentials, and data stays within those platforms. Work with your IT provider to ensure access policies, multi‑factor authentication, and permissions are configured appropriately.